|
How to use the Windows Audio Compression Manager |
  
|
|
How to use the Windows Audio Compression Manager |
  
|
The Windows Audio Compression Manager (MSACM32.DLL) allows an application to convert data between different formats. By itself, the ACM is not capable of performing any conversions. Instead, it relies on installable drivers to perform specific conversions. These drivers are called codecs, converters, or filters (sometimes the term codec is used in a more generic sense, to refer to all three types of ACM drivers).
A codec converts from one format to another; for example, from PCM to MS-ADPCM. A converter converts between different types of the same format; for example, between 8 and 16 bit PCM, between mono and stereo, and between different PCM sampling frequencies. A filter modifies the audio data without changing the format; for example, an echo filter might make a 44,100 Hz PCM wave file sound different, but it would still be a 44,100 Hz PCM file.
There are several ACM drivers that are automatically installed with the Windows system (other ACM drivers can be installed at any time). There are drivers that provide support for the compressed formats MS-ADPCM, IMA ADPCM, the GSM 6.10 standard, the TrueSpeech voice and the MPEG Layer-3 coding format.
The first thing to do in order to take advantage of Audio Compression Manager features, is to set the EncodeFormats.FormatToUse property to ENCODING_FORMAT_ACM; after this first setting you can proceed with ACM codecs, using properties and methods exposed by the EncodeFormats.ACM property, in one between the following 3 ways:
| • | Enumerating the installed codecs and choosing a certain codec and codec format |
This approach can be predisposed setting the EncodeFormats.ACM.EncodeMode property to ACM_ENCODE_USE_CODEC_INDEX
Then you need to enumerate codecs installed inside the target PC through a call to its EncodeFormats.ACM.InitCodecs method.
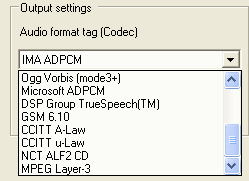
At this point you can obtain the total number of supported codecs through a call to the EncodeFormats.ACM.GetCodecsCount method: for each codec you can obtain the friendly name through the EncodeFormats.ACM.GetCodecDesc method. These two methods will allow filling a combobox as seen on the screenshot below:

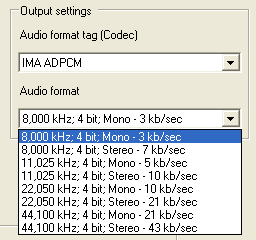
Finally you can enumerate the formats supported by the codec chosen above; the total number of supported formats can be obtained through a call to the EncodeFormats.ACM.GetCodecFormatsCount method: for each of the available formats you can obtain the friendly description through the EncodeFormats.ACM.GetCodecFormatDesc method. Also in this case, these two methods will allow filling a combobox as seen on the screenshot below:

| • | Filling a WAVEFORMATEX data structure with information specific for a certain codec and codec format |
As you may know, each codec's format is described through a WAVEFORMATEX data structure: the WAVEFORMATEX structure, common to all waveform-audio formats, is defined inside the Microsoft SDK as follows:
typedef struct {
WORD wFormatTag;
WORD nChannels;
DWORD nSamplesPerSec;
DWORD nAvgBytesPerSec;
WORD nBlockAlign;
WORD wBitsPerSample;
WORD cbSize;
} WAVEFORMATEX;
The cbSize parameter defines how many extra-bytes, specific for a certain codec, are appended to the end of the WAVEFORMATEX structure
In certain situations, for example if your application doesn't allow a user interaction for selecting from a combobox the codec and the respective format, you may require the possibility to fill a WAVEFORMATEX structure and to pass it directly to the ACM object: in this case you can start setting the EncodeFormats.ACM.EncodeMode property to ACM_ENCODE_USE_WAV_FORMAT.
Once predisposed, the WAVEFORMATEX structure can be set into the control through a call to the EncodeFormats.ACM.SetCodecFormatWavData method.
It's important to note that further encoding through the format defined inside the WAVEFORMATEX structure will not work if the specific codec is not installed on the target PC.
Just for your information, if you have already enumerated the available codecs and respective formats, as seen inside the previous point, the total size in bytes of the WAVEFORMATEX data structure that describes a given format, including any extra-byte the specific format may require, can be obtained using the EncodeFormats.ACM.GetCodecFormatWavDataLength method. The returned size of the WAVEFORMATEX data structure, expressed in bytes, can be used to allocate a buffer that will be filled by a call to the EncodeFormats.ACM.GetCodecFormatWavData method.
| • | Downloading a WAVEFORMATEX data structure, filled with information specific for a certain codec and codec format, from an Internet URL |
This method is very similar to the previous one and is useful for downloading the WAV format of an ACM codec without the need to visually enumerate codecs currently installed on the target PC and also when coding with languages like JavaScript which don't allow accessing data structures in binary format: in this case you can start setting the EncodeFormats.ACM.EncodeMode property to ACM_ENCODE_USE_WAV_FORMAT_FROM_URL.
At this point you should create a WAV file encoded with the specific ACM codec you will need to use and upload into your web server: for creating this specific WAV file you can use our AudioCompressionManager sample or the standard Sound Recorder application Sndrec32.exe installed by Windows.
Finally you can download from your web server the mentioned WAV file using the EncodeFormats.ACM.DownloadCodecWavFormatFromURL method: this method will download the WAV file from your web server and will parse and store internally its ACM settings. Calling the method generates a CodecWavFormatDownloadStarted event. The CodecWavFormatDownloadDone event is fired as soon as the download is completed: obviously, the smaller the file, the faster the download session.
It's important to note that further encoding through the downloaded WAV format will not work if the specific codec is not installed on the target PC.
Once chosen one between the ways above, you can start the needed exporting session using the ExportToFile method.