|
How to use the component in your projects |
  
|
|
How to use the component in your projects |
  
|
First of all let us say that if this guide should not be clear to you, feel free to contact our support team for any doubt or curiosity you may have: we usually answer all of our customers (and not) questions in less than 24 hours. Note that the purpose of this guide is to give a taste of the main features available inside Audio DJ Studio.
A number of working samples has been installed with the setup package: they could be of help in order to integrate what is currently written inside this documentation.
As an integration to this guide, several examples of use of this component, in C# and VB.NET languages, can be found inside the "Samples" folder: if during the setup phase you left the installation directory to its default, you will find them inside "C:\Program Files\Audio DJ Studio for .NET\Samples".
The first needed step is to add the control to your project: see the How to add the control to your projects tutorial for details.
Starting from version 4.0, Audio DJ Studio can manage both DirectSound and ASIO drivers; inside this tutorial we will refer to DirectSound only: information about ASIO drivers management can be found inside the related tutorial How to manage ASIO drivers
Before starting sounds management, the component needs to be initialized: for this purpose it's mandatory a call to the InitSoundSystem method; the best place to call this initialization method is usually the container form initialization function: for example, when using Visual C#, it will be the Form_Load function.
Important note
All of our audio-related components share the same instance of the multimedia engine AdjMmsEng.dll or AdjMmsEng64.dll whose initialization/disposal requires a certain amount of time because it needs to negotiate with the underlying Windows multimedia system and the sound card drivers: this operation, depending upon the system and quality of sound card drivers in use, may require some second. In order to obtain a better efficiency when instancing the component on multiple container forms within the same application, it would be highly recommended hosting and initializing, through the InitSoundSystem method, an instance of the component inside a form that will stay alive for the full life of the container application, for example the application's main form: although this instance of the component may stay hidden and may never be used, the memory footprint would be in any case irrelevant but it would keep the multimedia engine alive, allowing a faster loading/disposal when the container form is closed/opened.
|
Purposes of calling the InitSoundSystem method are the following:
| • | synchronising the component with its container form |
| • | deciding how many players (*), also known as "virtual decks", will be allocated |
| • | choosing the output device (sound card) that will perform the final sound playback for each of the allocated players: the number and descriptions of available output devices can be obtained with a prior call to the GetOutputDevicesCount and GetOutputDeviceDesc methods. The current output device can be changed at any time using the StreamOutputDeviceSet method: this features is very useful if you need a monitor output for your headphones. For further details about the "multi-player" management, take a look to the How to deal with multi-player features section. |
When a USB device is plugged or unplugged, the container application will receive a DeviceChange event: after receiving this event, if you need to remain in sync with available sound cards, you will have to reset the multimedia engine through the ResetEngine method: after this resetting procedure (whose completion could require some second) it will be again possible enumerating available output devices through the GetOutputDevicesCount and GetOutputDeviceDesc methods. At this point you will have to re-initialize the control through the ResetControl method.
If the multimedia engine shouldn't find any enabled or valid output device, the container application would be notified through the WarnNoOutputDevice event.
Important note when running under Windows Vista or higher versions
When the component is set to work with WASAPI drivers (see the How to manage audio flow through WASAPI tutorial for details), USB device plugging or unplugging doesn't require the engine to be reset because the list of available audio devices is automatically kept up to date.
|
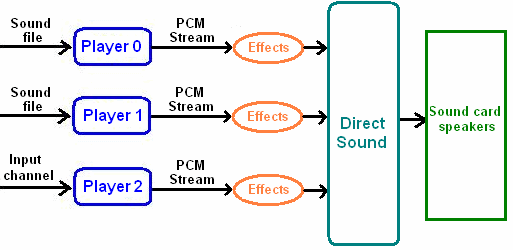
Each player allocated through the InitSoundSystem method generates an audio stream which, after being modified through special effects, can be sent to different destinations; till version 3.x of the component, the unique available destination of the modified audio stream was, through the interaction with DirectSound, the selected output device or, at the best, a specific speaker of the output device; the graph below summarises the old situation:

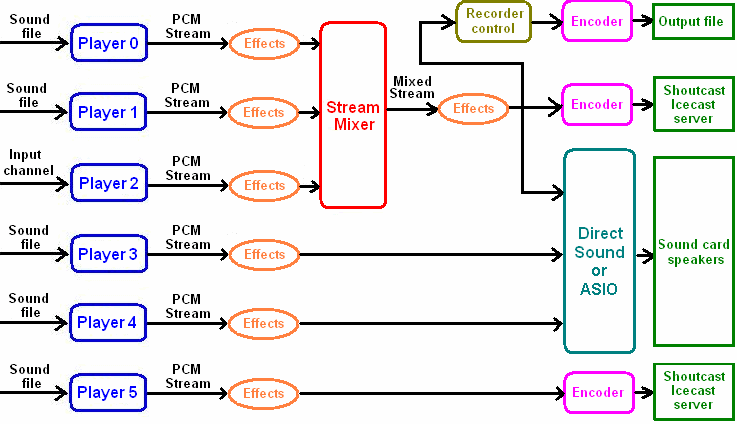
Starting from version 4.0, the component has more possible choices in order to redirect the audio stream; just take a look to the sample graph below:

As seen in previous graph related to version 3.x, Players 3 and 4 displayed on the graph above still can output their stream directly to DirectSound but now we have some more features.
The main new feature is the availability of custom "Stream Mixers" which allows mixing a number of streams generated by different players (in the graph above represented by Players 0, 1 and 2); the mixing result can be redirected to one or more of the following destinations with the possibility to apply further effects (for example changing the volume of the mixed streams or changing its output device):
| • | Directly to DirectSound |
| • | Through the use of an external encoder (Lame.exe for MP3, Fdkaac.exe for AAC+, OggEnc.exe for Ogg Vorbis), to a Shoutcast or Icecast server: in this case the control behaves as a Shoutcast/Icecast source. |
| • | In combination with our Audio Sound Recorder component, directly to an output file whose format can be predisposed inside Audio Sound Recorder itself. |
It's very important to note that the three destinations described above can be applied all at the same time: this means that you can hear what is being played and mixed on your local speakers, at the same time you can send what you are hearing to a Shoutcast/Icecast server and, again at the same time, save what you are hearing into a file on your hard disk. More details about this feature can be found inside the tutorial How to use custom Stream Mixers.
Another feature added starting from version 4.0 is the capability for a player (on the sample above identified by Player 5) to send its audio stream directly to a Shoutcast or Icecast server through the use of an external encoder (Lame.exe for MP3, Fdkaac.exe for AAC+, OggEnc.exe for Ogg Vorbis). More details about this feature can be found inside the tutorial How to use the control as a source for Shoutcast/Icecast servers.
At this point you can decide if you prefer working with single sound files or with playlists or both:
| • | If you want to work with single sound files see the How to work with single songs and video clips tutorial. |
| • | If you prefer to work with playlists see the How to create and manage a playlist tutorial. |
In either cases you will have an amount of operations you can do with loaded songs. As a starting point, below is a subset of the available methods and properties:
Control of the volume through mixers: usually every sound card have a mixer which can be used in order to set the card volumes; you can access these information using the following methods:
MixerGetCount to get the number of mixers currently installed: usually one mixer is available for every installed sound card.
MixerGetDesc to retrieve a friendly description of a mixer.
MixerVolumeSet/MixerVolumeGet to set/get the volume of a system mixer
MixerMuteSet/MixerMuteGet to set/get the mute state of a system mixer
When dealing with Windows Vista and higher versions, mixers can be managed more easily through the usage of the CoreAudioDevicesMan class: see the How to access settings of audio devices in Windows Vista and later versions tutorial for further information about this feature.
Player volume/pitch control: you can control how the song is performed in a variety of ways; thanks to the use of DirectSound every player can have a separate control over the following settings:
StreamVolumeLevelSet to set the volume on the given player
StreamVolumeSlide and StreamVolumeSlideEx to start a volume sliding on the given player
StreamBalanceSet to set the balance on the given player
Effects.PlaybackTempSet to set the tempo on the given player
Effects.PlaybackRateSet to set the playback rate on the given player
Effects.PlaybackPitchSet to set the pitch on the given player
Special effects: you can apply several types of effects to the sound under playback; check the How to apply special effects to a playing sound tutorial for further details.
Song duration and position retrieval: you can know the duration and the current position of a playing song thanks to the following methods:
SoundDurationGet to know the duration of a song expressed in number of milliseconds
SoundDurationStringGet to know the duration of a song expressed with a formatted string (HH:MM:SS:MsMsMs)
SoundPositionGet to know the current position of a playing song expressed in a chosen unit
SoundPositionStringGet to know the current position of a playing song expressed with a formatted string (HH:MM:SS:MsMsMs)
GetCurrentPercentage to know the currently played percentage
GetPlayerStatus to know a player status
Automatic Fader: allows an automatic management of the fade-in/fade-out process through the following configurable object:
Visual feedback: you can give to the listener a customizable visual feedback of the songs being played through the embedded VU-Meter, Spectrum Analyser, Oscilloscope and Waveform display:
Tags retrieval: many formats add some information, also known as tags, to the song binary in order to allow an automatic identification of the file contents: the availability of this information and its contents can be retrieved using the following methods:
IsTagAvailable determines if a certain type of tag is contained inside the song binary
GetTagString retrieves a string inside the tag
GetMp3Tag2Size retrieves the size of the ID3V2 tag for a MP3 song
GetMp3Tag2Data retrieves the full contents of the ID3V2 tag for a MP3 song
General info retrieval: information about the loaded song and the general control status can be obtained using the available properties:
GetPlayerStatus retrieves the status of the given player
LastError property retrieves the last error code generated by the call to a certain method
During sound loading, streaming and playback, the control will fire a set of predefined events that will give the possibility to the form user interface to be updated accordingly: refer to the "Events" chapter of this documentation for details about each of the available events. The How to synchronize the container application through events tutorial will give you some more information about events management.
(*) A "player" can be compared to a physical "deck" on a DJ console, the place where you put the vinyl/CD to be played; the developer can create a console with many virtual decks that can play simultaneously many different songs on one or more sound cards, each deck having its own volume/tempo/pitch settings. The availability of a certain number of players (decks) will enable the container application to mix several songs on different output channels, giving for example the ability to play advertising spots while songs are being played/mixed on different output channels: this is very useful for multi-channel radio stations automation software.